GEMINI IMAGE WATERMARK REMOVAL · PRACTICAL GUIDE
Why Gemini watermark removal leaves a faint outline — and what to try
The white star disappears, but a pale edge, dark patch or blurry corner remains. The useful question is not just “did it remove the logo?” It is “does the area underneath still look right?”
If a remover leaves an outline, try a different approach on the original watermarked file. Resizing, compression and previous edits can change those pixels. Our remover accepts the file you have—including compressed JPGs—and lets you inspect the repair before downloading. Repeated removal on the same edited copy can make the damage harder to repair.
Why does Gemini watermark removal leave traces?
A visible Gemini or Nano Banana sparkle is blended into the image. Removing it means estimating the colors that were there before. A small error in its position, brightness or opacity can leave a recognizable edge even when the bright center has gone.
A template-based method, often called inverse-alpha removal, tries to reverse that blending. It can work very well when the template matches an original export. But a screenshot, a resized copy or JPEG compression may no longer fit the same assumptions. A dark outline can come from removing too much brightness; a pale shape can come from leaving too much behind. These are possible causes, not a diagnosis of every failed image.
Blurring a remaining edge may hide it on a flat background, but can also soften nearby stone, hair, lettering or linework. A corner can look cleaner at thumbnail size while looking less natural at its actual resolution.
Built for the images you actually have
You may have a JPG sent through a chat app, a resized copy, or an image downloaded some time ago. A tool that works beautifully on an untouched export may still leave an obvious mark on that file. That gap is why we built this remover.
We first improved our template-based method: more accurate positioning, more parameter searches and template adjustments. Some images improved; others still had a visible edge, and stronger smoothing could flatten the texture. Instead of asking users to find a perfect original every time, we developed restoration that learns from varied examples.
Our tool uses a trained restoration model to predict a repair for the watermark and nearby image detail. This gives you another approach when reversing an overlay leaves an outline or patch. You do not need to choose a model, adjust opacity or paint a mask: choose your image, click Remove watermark, and inspect the result.
You do not need a lossless PNG to use the tool. Original downloads, compressed copies, resized images and screenshots can all be tried, as long as the mark remains in the bottom-right processing area. Common formats, including HEIC, are handled for you; any needed format conversion happens on your device. If a remover asks for an untouched export you no longer have, you can still try the file you have here. Compression can destroy fine detail, however, and restoration cannot promise to recover information that is no longer present.
The practical goal is a less distracting corner, including the edge around the mark and the texture behind it. A learned repair can also change or soften detail, so it is not a promise of exact recovery. We do not claim that it beats every other remover on every image.
The tool only sends the corner needed for restoration to our server. Only the bottom-right 256 × 256 pixel region is uploaded; the browser combines the returned patch with your image. For a 256 × 256 input, that region is the whole image. Processing files expire 10 minutes after completion or cancellation and are removed by automatic cleanup. See the privacy policy for metadata retention and operational records.
Free, no account, no settings to learn. Upload PNG, JPG, WebP, AVIF, HEIC/HEIF, BMP or a still GIF, up to 20 MB. Download a PNG at the same image dimensions. See supported image sizes and processing limits for the full details.
An actual result you can inspect
A star across a ledge
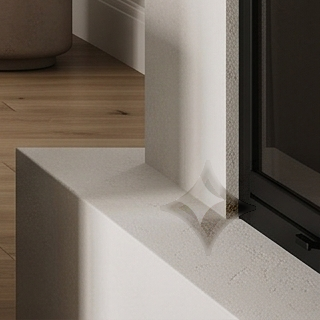

Our earlier inverse-alpha method and this tool, on the same image. Actual outputs, without manual retouching.
Compare with the original watermarked image
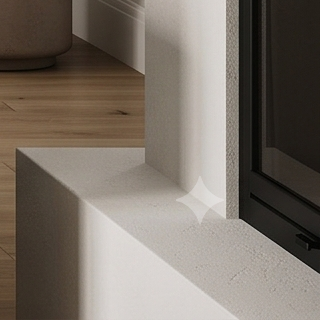
Look at the dark edge left by the earlier method and the continuation of the ledge in the new result. “Try this image” loads the same input into the tool so you can process it yourself. You can also open the original PNG and processed PNG at full size.


We keep improving the restoration model and publish dated results, so you can judge the actual output rather than a promise about the technology. See more examples, including a case with a remaining trace.
How this comparison was made
The earlier result is from our own inverse-alpha workflow, not a current competing website. The new result was processed by P20 on November 16, 2026, without manual retouching. These selected examples demonstrate a difference on these images; they are not an overall success rate. Our earlier AuraTuner research article explains the experiments that led to this tool. Its historical 30-image review evaluates different model versions.
Which next step fits your image?
| Your situation | What to try |
|---|---|
| You are making a new Gemini image | Check Gemini’s native watermark setting first. Avoiding the visible overlay can avoid the need for restoration. |
| You have an original download with a visible corner star | Try the remover on that file. Keep the original so you can compare or start over. |
| Another removal left an outline or dark patch | Return to the original watermarked file and try our restoration model. Do not use the already damaged output as your first choice. |
| You only have a compressed or resized copy | You can try it, but inspect edges and texture carefully. Ask for the original file if the repair is not convincing. |
| The mark was cropped away, moved, or is another logo | This tool may alter the wrong area. It is intended for the Gemini sparkle inside the bottom-right 256 × 256 pixels. |
Can you turn the watermark off in Gemini itself?
Google documents a Media Watermark setting in Gemini Apps for newly generated content. Availability depends on region and plan; check Google’s current instructions for your account. An existing downloaded file with a visible mark is a separate editing task. This remover is for those still images.
Visible marks and invisible provenance are different. This tool does not target SynthID, and removing a visible star does not establish that an image has no invisible watermark. It does not process video.
How to check whether a removal is actually better
- Inspect at actual pixel size. A small preview can hide a pale outline. Open the PNG at 100% and compare the same area in the original.
- Check more than the star. Look for a darker rectangle, a seam at the patch boundary, changed colors and softened texture.
- Look closely at text and straight lines. A plausible-looking repair can still change a letter or bend a fine edge.
- Keep the original if the repair is worse. A different method may suit that file better. Repeated processing is not a reliable way to improve it.
Use images you own or have permission to edit. If you hit a repeatable processing problem, contact us with the symptom, browser and approximate time. You do not need to send a private image to describe a faint outline or a failed request.
Maintained by the AuraTuner team, an independent service not affiliated with Google. Sources: Google’s watermark settings, our earlier restoration research, and the current model’s public sample.